Utilising Xfer Serum’s frequency modulation capabilities to design a solid bass.
There are a lot of options available for excellent sounding bass samples. Yet, they are sometimes limited in respect to creating your own pattern and notation. Thats why there are great advantages to be had when synthesising your own original bass patches from scratch. Today we are going through some of the tricks and techniques our sound design team at Audiotent use when creating unique preset libraries.
There are so many great sounding synthesizers. Both software and hardware are capable of generating wide range of bass timbres. For our step-by-step guide we decided to use Xfer Serum due to its easy to follow layout, excellent sound and affordability.
What makes a perfect bass? There is no direct answer to this question. Each sub-genre within electronic music requires a different set of timbres to fit its style. So there is no ‘perfect bass’. For example, a dubstep wobble bass with lots of over the top processing might not be a best fit for a mellow deep house production and vice versa. Therefore, the focus of this step-by-step guide is to aim for common techniques that can be applied to genres across the board.
It is healthy to be open minded to use a wide range of synthesis techniques, combining west coast, east coast and wavetable synthesis into one patch. This gives us more creative options and opens up the sound palette to more futuristic soundscapes. For example, we are using wavetables for the core oscillator sound. FM for additive harmonics and a traditional Moog ladder filter to low pass high frequencies.
Follow along and find out how we designed this solid FM inspired bass patch. To finish things off we will show you some creative FX that will help the sound fit better within your mix.
Step 1.
The first step is to load Xfer Serum into your DAW. Then click ‘Menu’ and ‘Init Preset’. This will initialise all of Serum’s parameters to its default state. If you play the keys on your MIDI keyboard you should only be hearing a raw unaffected sawtooth patch.

Step 2.
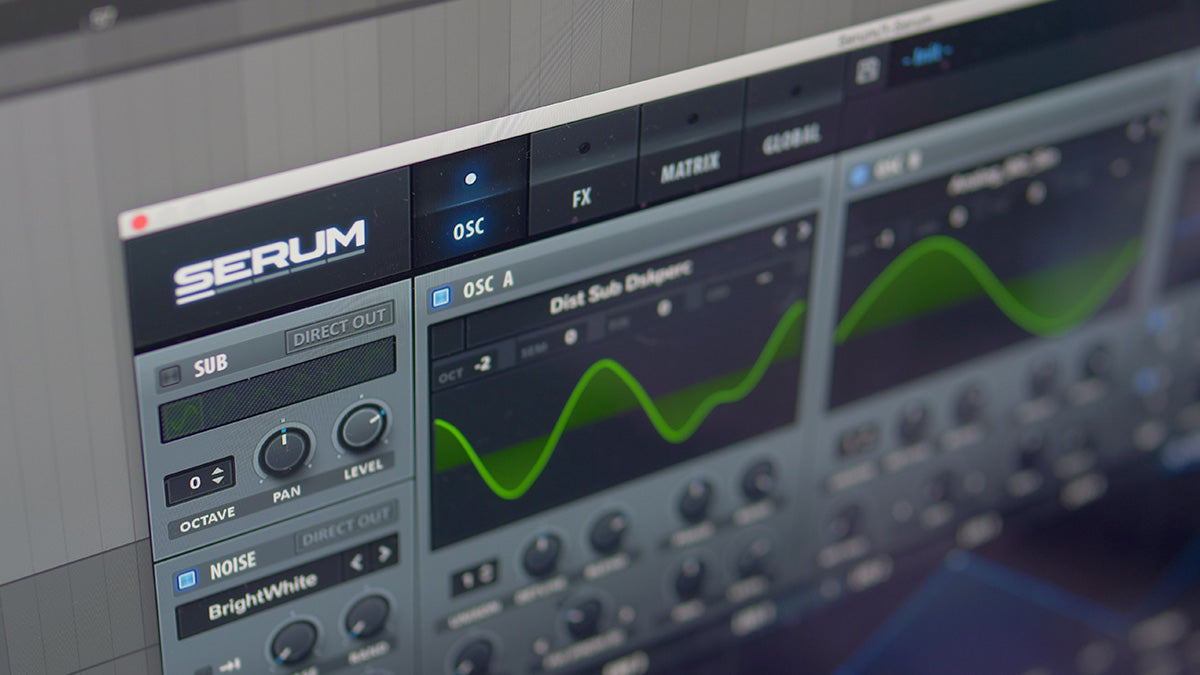
The next step is to find the right core wavetable for the preset. Something solid that has a fairly simple timbre, as we will be adding frequency modulation later on to increase its harmonic content. We settled down with the ‘Dist Sub Dskperc’ from the ‘Digital’ folder. To get the wavetable into the correct range for a bass, it needs to be pitched -2 octaves.

Step 3.
Using Frequency Modulation is a great way to add harmonics and edge to your bass. In order to set this up in Serum a modulation oscillator is needed. A new wavetable is loaded into OSC B, called ‘Analog_BD_Sin’. Choosing a simple sine wave goes a long way in FM synthesis. This allows for more range over modulation before the carrier ‘OSC A’ becomes too harmonically complex.

Step 4.
In order to assign Frequency Modulation to OSC A. Open the warp menu and select ‘FM (from B)’. Whilst triggering Serum, experiment with moving the FM (from B) control up & down. You will be able to hear a more aggressive sound as you increase this parameter. Currently, you are hearing both the output of OSC A & B. Turn the main level of OSC B all the way down, so that it only acting as a modulation source.

Step 5.
Another measure of control over the FM sound is the frequency of the modulation source (OSC B). Experiment with pitching this up/down in semitones, octaves or even fine tune until you find the sound you like. In this example, we opted for -1 octave.

Step 6.
Adding some noise to the signal path can make the preset appear more organic and give extra dirt. Subtle settings can work wonders. Serum has a dedicated Noise OSC with lots of noise samples to choose from. ‘BrightWhite’ from the ‘Analog’ folder worked nicely for this patch.

Step 7.
Another key component of subtractive synthesis is the filter. Serum offers a substantial amount of choice when it comes to types. However, in this example we are going to keep it simple with a classic 12db low pass filter. Switch on the filter section. By default only OSC A is routed to the filter, click the square LED next to the ’N’ in order to route the noise OSC through the filter. Now you can use the filter cutoff parameter to reduce any unwanted high frequencies.

Step 8.
It’s always good practice to add subtle variation to your preset. This leads to sounds that are move alive and dynamic. LFO’s are your go-to tools when aiming to add movement. In this bass example we are using LFO 1 to target the amount of FM applied in OSC A. Serum makes it
easy, simply drag the crosshair from LFO 1 and place it on the FM (from B). You will now see the blue circle placed around the FM knob. Which visually represents the modulation range.

Step 9.
Distortion can be aggressive or it can also be subtle. For this particular sound, the aim was to round off the transients and thicken up the sound. The ‘SoftClip’ algorithm is a good choice because it is not as destructive as some of the options available in Serum’s distortion module. The drive control is push above halfway until a slight thickening of the sound is audible.

Step 10.
It is a misconception that delays should be avoided when effecting bass sounds. However, most modern delay units have filters built in to allow the signal to be high-passed. This is exactly what we need for this bass. The sub frequencies stay firm in the centre, whilst the mid to high frequencies receive stereo treatment.

Step 11.
The final FX treatment is a compressor. More often than not it is not a necessity to use a compressor on synthesized sounds. Having said that, it can be a nice addition to add punch, control the transient and reduce dynamic range. A medium attack and release times were used. Dial in the threshold parameter until a small amount of gain reduction is apparent.

Step 12.
As a final stage we can setup Serum’s macro parameters to control one or more settings at a twist of a dial. This makes it convenient when adding automation inside your DAW. If your MIDI keyboard doesn’t have rotary knobs, you could always utilise the mod-wheel as a hands control to affect multiple parameters within Serum.

We trust you enjoyed following on this step-by-step tutorial. Now its your turn to implement these techniques into your own productions.
Looking for Xfer Serum Techno & Melodic Techno Presets? Take a look at the following preset libraries:
Pulse // Xfer Serum Presets & Eurorack Wavetables – https://www.audiotent.com/presets/pulse/
Cerium // Xfer Serum Techno Presets – https://www.audiotent.com/presets/cerium/
Diode // Xfer Serum Melodic Techno Presets – https://www.audiotent.com/presets/diode/
Chaos // Xfer Serum Tech-House Presets – https://www.audiotent.com/presets/chaos-xfer-serum/
This article was written by Neil & Ed (Audiotent) and can also be seen in Computer Music Magazine.
Leave a comment
This site is protected by hCaptcha and the hCaptcha Privacy Policy and Terms of Service apply.