Audiotent Tip 407. The Ultimate Guide To Sonic Academy Kick 2.
The kick drum is one of the most important elements within electronic music. It’s the most dominant and powerful element of your track and is the topic we receive most production tip requests about.
Questions such as, how do I tune my kick to my track, how do I make my kick punch through the mix, how do I layer my kicks, should I use compression on my kick drum, and much more.
So, we thought the best way to answer these questions would be to create an ultimate guide to creating kick drums.
Our choice of plugin for working with kick drums is Sonic Academy Kick 2. This versatile tool has all the controls you need to create the perfect kick for your music; A sub tone generator, multiple click transients, full envelope control, additional harmonics section, EQ, compression and much more!
In this ultimate guide, you will learn what each area of the plug offers and discover some essential techniques for creating awesome sounding kicks. By the end of this ultimate guide, you will have complete knowledge of every parameter inside Sonic Academy Kick 2 and will be able to make your own amazing kicks from scratch. So pop the kettle on, grab a juice or whatever refreshment takes your fancy and dive in.
Don't be overwhelmed by the amount of information covered. If you just want to learn about a specific topic access by clicking below:
Sub Tone Generator (Sub Control)
Pitch Envelope
AMP Envelope
Kick Length
Sculpting The Perfect Click
Using The Keytrack To Your Advantage
Finding The Right Click Sample (Quick Method)
Using Distortion To Colour Your Kicks
Harmonics
Compressor
Limiting
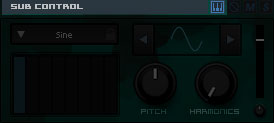
The sub-control section is the heart of your kick drum. This is where all the low end is being generated from. The sub-control section allows you to control the overall sub level with the volume slider on the right. Underneath that is a pan control. Since we always want the sub to be in mono, it’s best to keep the pan knob centred. Next, to the pan control is additional harmonics and pitch knobs but we’ll get into that later. For now, let’s look at how to shape the sub by using the main Pitch and AMP envelope windows.

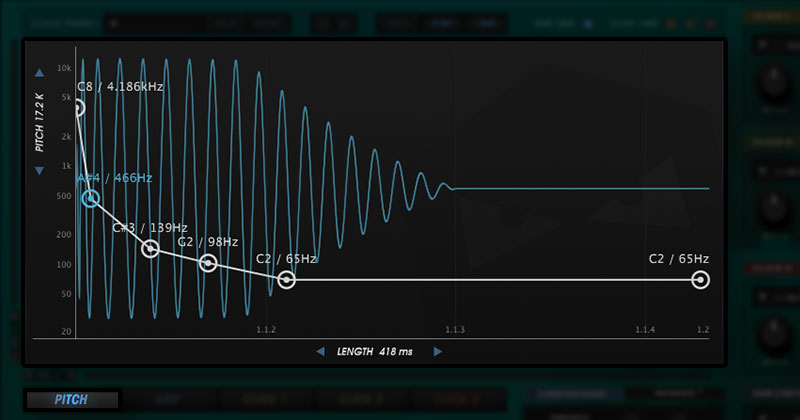
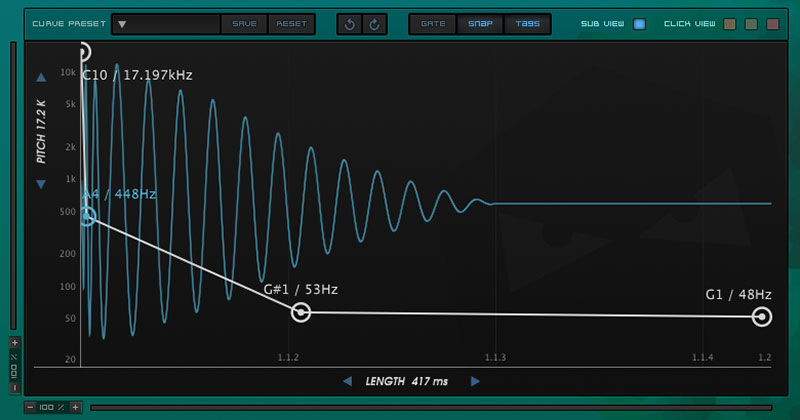
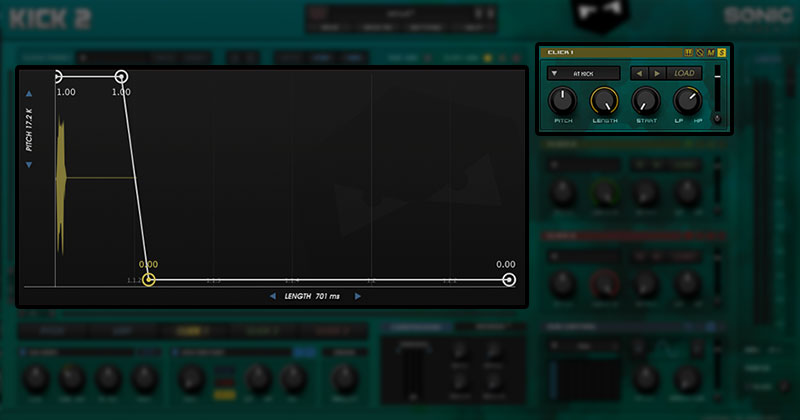
Controlling and defining the pitch envelope of your kick is essential for creating a solid, punchy low end. This is very easy to achieve with Sonic Academy Kick 2. Inside the pitch envelope window, you will see the nodes decreasing over time. The first node to the left is the starting pitch frequency and the last node on the right is the finishing frequency (but this is not necessarily the key of your kick).
There are two ways to tune your kicks inside the plugin. The default way is by using the nodes inside the main pitch envelope window. As you will see, each node has both Hz and musical note values. Sometimes the key of the kick is not so obvious, especially with short length kicks. Generally, the key of the kick is defined by the longest (most sustained) pitch.
In the example below, you can clearly visualise the most sustained pitch is G. This will be the key of your kick.
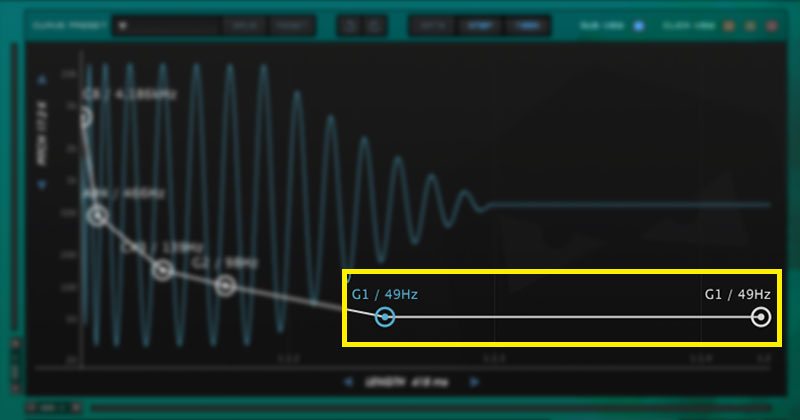
The alternative way to tune your kick is to switch on the keytrack button in the sub control area. Once this is switched on, tune your kick to the key of C inside the main sub pitch envelope window. This will allow you to use your MIDI keyboard or piano roll to alter the pitch of the kick drum. The reason for a specific key of C is so that the key you play on your keyboard corresponds to the correct pitch.
Both pitch and AMP envelopes allow you to create multiple nodes. However, when working with the pitch, be cautious, as very small adjustments can make a big difference.
Don’t be afraid to add multiple nodes and drag them around whilst playing the kick, this way you’ll learn how moving a node in pitch alters the tone of your sub.
AMP window allows us to control the amplitude envelope of the sub oscillator. Double click any space in the curves window to add a new node. Double click a node to remove it. Move the nodes around to fine-tune and shape your sub.
Use the attack stage to add or remove the click from the sub. This is useful when applying additional click samples and layering them with the sub oscillator. Simply set the first node to zero and move the second node further to the right to add a slow attack for your sub.
One of the most useful aspects of the AMP window is the ultimate control over the sustain. Here you can really tailor the way your kick decays, so that it works perfectly within your track.
A great way to learn what is happening with the AMP window is to move nodes around and play the kick in real time. You will then hear how each movement affects the final shape/sound of the kick.
Always make sure your final node in the window resets to zero, so that you don’t get any clicks or pops in-between your kicks.
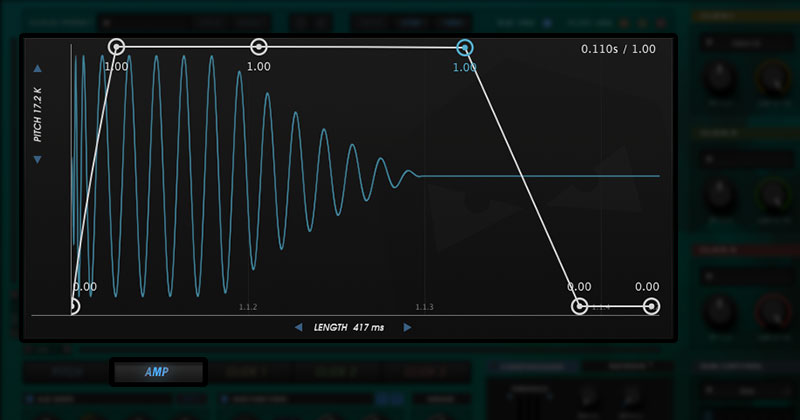
Here you can decide how long or short you would like your kick drum to be. You can set the desired length in milliseconds whilst keeping an eye on the actual length of the kick drum in relation to the beats/bars inside your project. This is also displayed in the main plugin window for easy reference.
For example, in this image, we have made the length of the kick drum last for just 1/8th note. Use the length slider to get precise control over how long your kick drum will last. Shorter, punchier kicks will often work best with the longer basslines and vice versa.
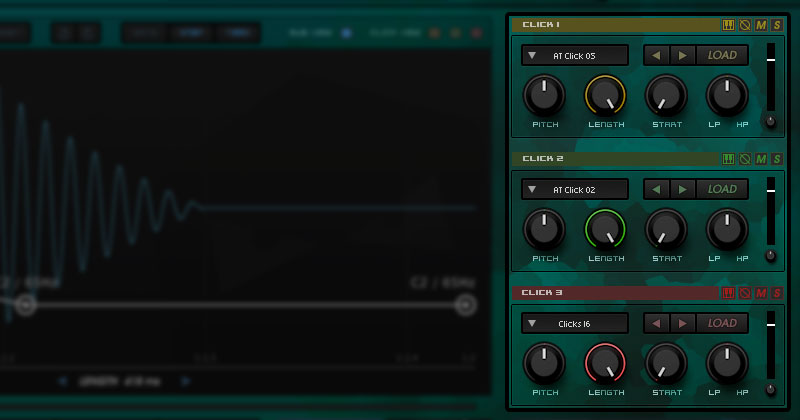
At the heart of Kick 2, we will find it’s three fully featured click areas. These are your ‘sampling engines’, if you will. Each click section can load a separate audio sample and manipulate it further.
Even though there are some benefits for selecting three separate click sources, it’s not necessary to use them all to achieve a great sounding kick. One or two is usually more than enough. This is especially the case, when you already found your desired kick sound with a nice midrange and top-end character. In this instance, you may only need to replace the sub frequencies of the sample with a purely synthesised tone to fit your track. Alternatively, the additional click sample can be a snippet of the hi-hat or high percussion to make the kick snappier and fit it in a busy mix.
Let's look into individual controls and applications of a click module:
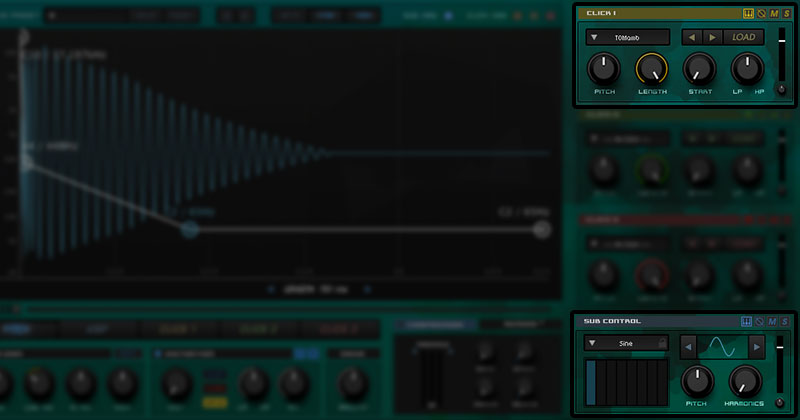
Keytrack is useful when we program a kick pattern with a changing pitch. If enabled, it will transpose the click or sub oscillator according to the incoming MIDI signal. Another example for utilising the keytrack would be low percussive sounds. First, load a short sample of the percussion, such as tom-tom transient into the click engine and enable the keytrack. Next, synthesise the main tone for this drum using the Pitch Nodes in the Pitch Window. Make sure the keytrack is also activated in the sub control area. You will now have a tom-tom sound, that perfectly follows the pitch of your MIDI keyboard/controller. This way you can play/program various fill patterns that work within the key of your track.
Clicks are essentially the transient portion of the kick or percussion sample. They are usually short and have little to no bodyweight in the low frequencies. Rather than trying to extract the click manually in your DAW and then load it into Kick 2, try out this technique:
First, locate your favourite kick library folder and then load one kick into the click area of Kick 2 plugin. Next, shorten the amp envelope of this click, so only the initial transient is being played, whilst the tail of the kick sample cuts off. Adjust the high pass filter to get rid of any unnecessary low frequencies. What you will end up with is a nice short click transient. Finally, all you have to do now is just click the left / right arrows to cycle through various ‘clicks’. Since the amplitude envelope and filter setting will automatically be applied to each kick sample, all we hear is the transients. It’s a great technique that allows us to quickly browse through a big library and choose the perfect click sample for our new kick.
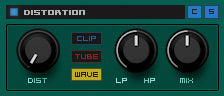
Distortion is a powerful tool for giving some edge, warmth or definition to the audio signal. We can use it to bring out extra detail and ‘color’ within a kick sample. Kick 2 plugin offers us three different distortion models; clip, tube and wave. All of these models have a distinct tonal character which may suit one kick better than the other etc... It is best to try all of these and find the perfect match for the kick you are working on.
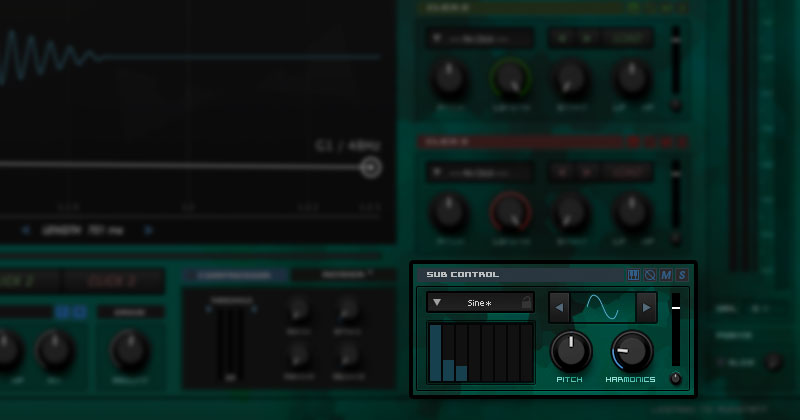
The harmonics section allows you to blend in additional overtones to your pure sine wave sub. This is a very useful section when looking to create unique sounding kicks. Here you can add anything from subtle amounts of say a triangle wave or transform it completely with rich overtones from a saw-tooth.
A cool feature of the harmonics section is that it allows you to adjust the volume level of each partial within the harmonic series. For example, using the default sine wave, add a small amount of volume to the 2nd and 3rd partials, then turn up the harmonics knob. Notice how this fills out the 100Hz-200Hz region. This can be a great way to add extra low-mid information.
If you’re unsure what this is adding to your kick, pull up an audio spectrum analyser and remove the 1st partial inside the harmonics sub control. This will give you a great visual representation of the overtones that are being applied.
The compressor section within Kick 2 allows you to enhance and shape your kick further. Although we would recommend perfecting the dynamics of your kick via the envelopes. Compression can also add the extra punch and tightness to the final result.
If you find your kick is sounding flabby and not as controlled as you would like, try dialling in a small amount of compression. Settings for this will vary from kick to kick but a great starting point would be:

As a producer, you will know that the kick drum represents the loudest element within the majority of electronic music. This is why it makes sense to limit your kick and gain complete control over its maximum value.
(Note: When we say limiting we’re not talking about smashing the life out your kick drum, we’re saying just -1db to -3db of reduction max)
Sonic Academy Kick 2 has a very useful brick-wall limiter included and you can use this to make sure you don’t go over 0 dBFS.
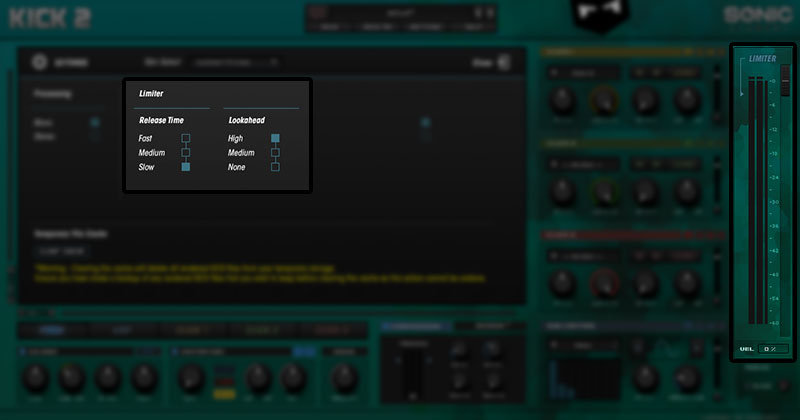
The limiter inside Kick 2 is switched on by default and can be toggled on/off by simply clicking the word “Limiter”. The threshold is then controlled by moving the arrow slider to the left, the more you move the slider down the lower the threshold. The amount of gain reduction can then be seen in the meter to the right.
There are a few extra controls that can be accessed via the settings tab. Inside here you will find the limiter release and look ahead times.
We hope you've found our Ultimate Guide to Sonic Academy Kick 2 extremely useful. Now that you know what every parameter does, its time for you to go and create some amazing sounding kicks drums!
The kick drum is one of the most important elements within electronic music. It’s the most dominant and powerful element of your track and is the topic we receive most production tip requests about.
Questions such as, how do I tune my kick to my track, how do I make my kick punch through the mix, how do I layer my kicks, should I use compression on my kick drum, and much more.
So, we thought the best way to answer these questions would be to create an ultimate guide to creating kick drums.
Our choice of plugin for working with kick drums is Sonic Academy Kick 2. This versatile tool has all the controls you need to create the perfect kick for your music; A sub tone generator, multiple click transients, full envelope control, additional harmonics section, EQ, compression and much more!
In this ultimate guide, you will learn what each area of the plug offers and discover some essential techniques for creating awesome sounding kicks. By the end of this ultimate guide, you will have complete knowledge of every parameter inside Sonic Academy Kick 2 and will be able to make your own amazing kicks from scratch. So pop the kettle on, grab a juice or whatever refreshment takes your fancy and dive in.
Don't be overwhelmed by the amount of information covered. If you just want to learn about a specific topic access by clicking below:
Sub Tone Generator (Sub Control)
Pitch Envelope
AMP Envelope
Kick Length
Sculpting The Perfect Click
Using The Keytrack To Your Advantage
Finding The Right Click Sample (Quick Method)
Using Distortion To Colour Your Kicks
Harmonics
Compressor
Limiting
Subtone Generator (Sub Control)
The sub-control section is the heart of your kick drum. This is where all the low end is being generated from. The sub-control section allows you to control the overall sub level with the volume slider on the right. Underneath that is a pan control. Since we always want the sub to be in mono, it’s best to keep the pan knob centred. Next, to the pan control is additional harmonics and pitch knobs but we’ll get into that later. For now, let’s look at how to shape the sub by using the main Pitch and AMP envelope windows.
Pitch Envelope
Controlling and defining the pitch envelope of your kick is essential for creating a solid, punchy low end. This is very easy to achieve with Sonic Academy Kick 2. Inside the pitch envelope window, you will see the nodes decreasing over time. The first node to the left is the starting pitch frequency and the last node on the right is the finishing frequency (but this is not necessarily the key of your kick).
There are two ways to tune your kicks inside the plugin. The default way is by using the nodes inside the main pitch envelope window. As you will see, each node has both Hz and musical note values. Sometimes the key of the kick is not so obvious, especially with short length kicks. Generally, the key of the kick is defined by the longest (most sustained) pitch.
In the example below, you can clearly visualise the most sustained pitch is G. This will be the key of your kick.
The alternative way to tune your kick is to switch on the keytrack button in the sub control area. Once this is switched on, tune your kick to the key of C inside the main sub pitch envelope window. This will allow you to use your MIDI keyboard or piano roll to alter the pitch of the kick drum. The reason for a specific key of C is so that the key you play on your keyboard corresponds to the correct pitch.
Both pitch and AMP envelopes allow you to create multiple nodes. However, when working with the pitch, be cautious, as very small adjustments can make a big difference.
Don’t be afraid to add multiple nodes and drag them around whilst playing the kick, this way you’ll learn how moving a node in pitch alters the tone of your sub.
AMP Envelope
AMP window allows us to control the amplitude envelope of the sub oscillator. Double click any space in the curves window to add a new node. Double click a node to remove it. Move the nodes around to fine-tune and shape your sub.
Use the attack stage to add or remove the click from the sub. This is useful when applying additional click samples and layering them with the sub oscillator. Simply set the first node to zero and move the second node further to the right to add a slow attack for your sub.
One of the most useful aspects of the AMP window is the ultimate control over the sustain. Here you can really tailor the way your kick decays, so that it works perfectly within your track.
A great way to learn what is happening with the AMP window is to move nodes around and play the kick in real time. You will then hear how each movement affects the final shape/sound of the kick.
Always make sure your final node in the window resets to zero, so that you don’t get any clicks or pops in-between your kicks.
Kick Length
Here you can decide how long or short you would like your kick drum to be. You can set the desired length in milliseconds whilst keeping an eye on the actual length of the kick drum in relation to the beats/bars inside your project. This is also displayed in the main plugin window for easy reference.
For example, in this image, we have made the length of the kick drum last for just 1/8th note. Use the length slider to get precise control over how long your kick drum will last. Shorter, punchier kicks will often work best with the longer basslines and vice versa.
Sculpting The Perfect Click
At the heart of Kick 2, we will find it’s three fully featured click areas. These are your ‘sampling engines’, if you will. Each click section can load a separate audio sample and manipulate it further.
Even though there are some benefits for selecting three separate click sources, it’s not necessary to use them all to achieve a great sounding kick. One or two is usually more than enough. This is especially the case, when you already found your desired kick sound with a nice midrange and top-end character. In this instance, you may only need to replace the sub frequencies of the sample with a purely synthesised tone to fit your track. Alternatively, the additional click sample can be a snippet of the hi-hat or high percussion to make the kick snappier and fit it in a busy mix.
Let's look into individual controls and applications of a click module:
- Pitch. This is essential for tuning the click. It will affect the tone and length of the sample, which can be visualised in the main display window, representing the waveform. Bear in mind, some of the clicks will have an extra tonal element to them, whilst others (short clicks) may not have a distinct pitch, therefore pitching them is not a necessity.
- Length. Quick control to shorten the sample. Useful for removing any excess ambience. If needed for a greater control, it’s best to use a dedicated CLICK envelope section. It allows fine tuning of the click’s amplitude over time in a nice visual context.
- Start. Use this parameter to adjust the start position of the sample. It will help to get rid of any unnecessary snap, click or pop sound. Sometimes, the original sample may have a little silent gap prior to the audio. Using the START control will allow us to remove this gap and trigger the audio exactly where it starts.
- LP/HP. The are two filter options available for each click area. By turning the LP/HP knob to the left we access a low-pass filter, whilst turning it right will give us a high-pass filter. These are essential sculpting tools for layering. E.g. Use a high pass filter to cut any excess low frequencies from the click sample. It will clear up that area to be used for the main body of the kick, preventing additional phasing issues or frequency masking.
Using The Keytrack To Your Advantage
Keytrack is useful when we program a kick pattern with a changing pitch. If enabled, it will transpose the click or sub oscillator according to the incoming MIDI signal. Another example for utilising the keytrack would be low percussive sounds. First, load a short sample of the percussion, such as tom-tom transient into the click engine and enable the keytrack. Next, synthesise the main tone for this drum using the Pitch Nodes in the Pitch Window. Make sure the keytrack is also activated in the sub control area. You will now have a tom-tom sound, that perfectly follows the pitch of your MIDI keyboard/controller. This way you can play/program various fill patterns that work within the key of your track.
Finding The Right Click Sample (Quick Method)
Clicks are essentially the transient portion of the kick or percussion sample. They are usually short and have little to no bodyweight in the low frequencies. Rather than trying to extract the click manually in your DAW and then load it into Kick 2, try out this technique:
First, locate your favourite kick library folder and then load one kick into the click area of Kick 2 plugin. Next, shorten the amp envelope of this click, so only the initial transient is being played, whilst the tail of the kick sample cuts off. Adjust the high pass filter to get rid of any unnecessary low frequencies. What you will end up with is a nice short click transient. Finally, all you have to do now is just click the left / right arrows to cycle through various ‘clicks’. Since the amplitude envelope and filter setting will automatically be applied to each kick sample, all we hear is the transients. It’s a great technique that allows us to quickly browse through a big library and choose the perfect click sample for our new kick.
Using Distortion To Colour Your Kicks
Distortion is a powerful tool for giving some edge, warmth or definition to the audio signal. We can use it to bring out extra detail and ‘color’ within a kick sample. Kick 2 plugin offers us three different distortion models; clip, tube and wave. All of these models have a distinct tonal character which may suit one kick better than the other etc... It is best to try all of these and find the perfect match for the kick you are working on.
Harmonics
The harmonics section allows you to blend in additional overtones to your pure sine wave sub. This is a very useful section when looking to create unique sounding kicks. Here you can add anything from subtle amounts of say a triangle wave or transform it completely with rich overtones from a saw-tooth.
A cool feature of the harmonics section is that it allows you to adjust the volume level of each partial within the harmonic series. For example, using the default sine wave, add a small amount of volume to the 2nd and 3rd partials, then turn up the harmonics knob. Notice how this fills out the 100Hz-200Hz region. This can be a great way to add extra low-mid information.
If you’re unsure what this is adding to your kick, pull up an audio spectrum analyser and remove the 1st partial inside the harmonics sub control. This will give you a great visual representation of the overtones that are being applied.
Compressor
The compressor section within Kick 2 allows you to enhance and shape your kick further. Although we would recommend perfecting the dynamics of your kick via the envelopes. Compression can also add the extra punch and tightness to the final result.
If you find your kick is sounding flabby and not as controlled as you would like, try dialling in a small amount of compression. Settings for this will vary from kick to kick but a great starting point would be:
- Attack - slow attack of around 30-100ms to let the initial transient through.
- Release – fastest setting 100ms so that the compressor recovers before the next kick.
- Ratio – a medium ratio of 4:1
Limiting
As a producer, you will know that the kick drum represents the loudest element within the majority of electronic music. This is why it makes sense to limit your kick and gain complete control over its maximum value.
(Note: When we say limiting we’re not talking about smashing the life out your kick drum, we’re saying just -1db to -3db of reduction max)
Sonic Academy Kick 2 has a very useful brick-wall limiter included and you can use this to make sure you don’t go over 0 dBFS.
The limiter inside Kick 2 is switched on by default and can be toggled on/off by simply clicking the word “Limiter”. The threshold is then controlled by moving the arrow slider to the left, the more you move the slider down the lower the threshold. The amount of gain reduction can then be seen in the meter to the right.
There are a few extra controls that can be accessed via the settings tab. Inside here you will find the limiter release and look ahead times.
- Limiter release; As a general rule, use longer release times for low-end information as this will help to reduce any distortion.
- Limiter lookahead; The limiter lookahead allows for a perfect brick-wall to be achieved. In essence, you’re allowing the limiter to view the signal before it hits so that it can anticipate the loud peaks before they occur. This makes sure that your kick drum never exceeds the threshold. When setting the Kick 2 plugin lookahead to high you are essentially putting it into brick-wall mode.
We hope you've found our Ultimate Guide to Sonic Academy Kick 2 extremely useful. Now that you know what every parameter does, its time for you to go and create some amazing sounding kicks drums!
Audiotent - Velocity // Tech-House Kicks for Sonic Academy Kick 2
Click here to listen and get your copy.

2 comments
Leave a comment
This site is protected by hCaptcha and the hCaptcha Privacy Policy and Terms of Service apply.